Building the Fleet in Azure with Terraform

In the series of Terraform posts we have shown how to effectively utilize Infrastructure as Code to build, deploy, scale, monitor and destroy a fleet of infrastructure across multiple regions in AWS. The beauty of Terraform is that while we may have used it to build out infrastructure in AWS, we can also extend it’s use to other cloud providers as well. As I see more and more organizations adopting a multi-cloud strategy, let’s take a look at what it would take to deploy our fleet into Azure.

Azure Specifics

If you are familiar with AWS, Azure provides many similar services and features. The Azure Terraform provider is used to interact with many of the Azure resources supported by Azure Resource Manager (AzureRM). A brief overview of the Azure resources will will utilize to move our fleet to Azure are:

Azure Authentication: Terraform supports authenticating to Azure through a Service Principal or the Azure CLI. A Service Principal is an application within Azure Active Directory whose authentication tokens can be used as the client_id, client_secret, and tenant_id fields needed by Terraform. Full details to create a service principle are well documented on the Terraform website.

Resource Group: Azure holds related resources for a given solution in a logical container called a Resource Group. You cannot deploy resources into Azure without assigning them to a Resource Group which we will create and manage via the Terraform Azure provider.

Virtual Network: Akin to a AWS VPC, Azure’s Virtual Network provides an isolated, private environment in the cloud. It is here where we will define our IP address range, subnets route tables and network gateways. This build will utilize the Azure network module maintained in the Terraform module registry.

Scalability: In order to scale our fleet to the appropriate size, Azure provides Azure’s Virtual Machine Scaling Set (VMSS). AWSS is similar to AWS Auto Scaling allowing us to create and manage a group of identical, load balanced, and autoscaling VMs. The fleet will be front ended by a load balancer so that we can grow/shrink without disruption and will utilize VMSS module up on my GitHub terraform_azure repository.

Deploy to Azure

For our initial Azure deployment will will create a new set of Terraform files, including a new main.tf to tie together the details of the Azure provider, modules and specifics for how we want to the fleet built. Inside the file we have declared our connection to Azure, the resource group to build, the virtual network details as well as the web server cluster. The VMSS module referenced also builds a jump server/bastion server in the event that you need to connect to the environment to do some troubleshooting. I have specified my Azure credentials as environment variables so that they are not included in this file.

All files to create this fleet in Azure including the main.tf, output.tf and VMSS module are available in the terraform_azure repository of my GitHub account.

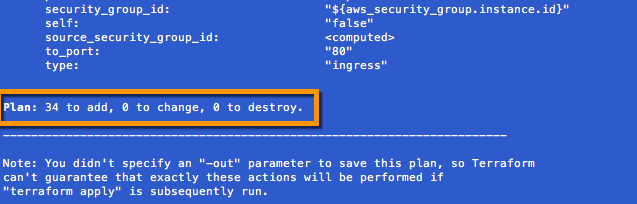
We can initialize, plan and apply our deployment using Terraform and immediately see our Azure resources being built out through the Azure Portal and inside our devtest resource group.

azurefleet.png
azureapplycomplete.png

Once the deployment is complete, we browse to the DNS name assigned to to the load balancer front ending our Azure VMSS group. This address displayed at the end of the Terraform output, as we included an output.tf file to list relevant information.

Browsing to the DNS name we can validate our deployment is now completed. At this time we can check the health of the deployment - remember there is a jump server that is accessible if needed.

hellofromAzure.png

Once you are happy with the state of the new fleet in Azure it can be torn down with a terraform destroy. I recommend doing this as we prepare for the next step in the series: Moving the Fleet from AWS to Azure.

This is part of a Terraform series in which we have covered:

Using Terraform to Up Your Automation Game: Multi-Environment/Multi-Region

In the last two posts we have been working with Terraform to automate the buildout of our Virtual Private Cloud (VPC) in AWS and deploy a fleet of scalable web infrastructure.  Our next step is to complete the infrastructure build so that it is identical across our development/test, staging & production environments.  Each of these environments reside in different regions: development (us-west-2), staging (us-east-1) and production (us-east-2).

File Layout

In the case of deploying our development environment, our work is really close to being complete.  We already have a working set of code that deploys into the us-west-2 region, which is contained in the main.tf and outputs.tf files. We will add one step, and that is to create a folder structure that allows our code to easily be managed and referenced.  At the top level we create a separate folder for each of our environments, and within each of these folders a sub-folder specifying the type of fleet we are deploying .  In the case of our development web server deployment, the folder structure is simple and looks like this:

. ├── dev │
   └── webservers │ 
   ├── main.tf │      
   ├── outputs.tf

There are a number of benefits with laying out our files in this manner - including isolation, re-use and managing state - which Yevgeniy Brikman does an excellent job of describing.  As Brikman indicates - "This file layout makes it easy to browse the code and understand exactly what components are deployed in each environment. It also provides a good amount of isolation between environments and between components within an environment, ensuring that if something goes wrong, the damage is contained as much as possible to just one small part of your entire infrastructure."

Deploy Development

Now that our file layout is the way we want it, let's deploy development.  Very simple, and something we have done a few times now.  Since we moved our two files into the a new folder location, we will need to initialize the deployment (terraform init), plan it (terraform plan) and finally deploy (terraform apply).

terraforminit_dev.png
terraform_plan_webservers.png
terraform_apply.png

Once complete we can browse over to see the development deployment.

webserver_dev.png

Deploy Staging

One of the most powerful benefits of deploying our infrastructure as code in a modular way is reusability.  In fact, to build out our staging environment is only a matter of a couple of steps.  First we will create a staging folder in which to store our files, and then we will copy over our main.tf and output.tf files.  We will then make a few edits to the main.tf including the following updates:  region, IP address space, tags, ami, cluster name, cluster size and key_names.  Looking at the differences between development and staging is as simple as running a compare between the main.tf files in the dev and staging folders.  The differences are highlighted below:

dev_staging_compare.png

Once we are happy with the updates, the sequence to deploy is exactly what we are use to.  This time we will run our initialize, plan and deployment from within the staging folder.  Once complete we can browse over to see the staging deployment.

webserver_stage.png

Production Deployment

Our production environment will mimic our staging environment with only a few edits including deployment to the us-east-2 region, and will start with 8 webservers in the fleet and scale as needed.  Once again leveraging infrastructure as code we will simply copy the main.tf and output.tf files out of staging and make our edits.  The differences between staging and production are highlighted below:

staging_prod_compare.png

Now we use the power of Terraform to deploy, and Viola...production is LIVE.

webserver_prod.png

Visualizing Our Deployment

Now that our 3 deployments are complete, we can see the folder structure that has been build out maintaining a separate state for each environment.

directorytree.png

To document and visualize our build out, I like to use hava.io which builds architecture diagrams for AWS and Azure environments.  As you can see all three environments are active and we can drill into any of them to see the details, including pricing estimates - production ($115/month), staging ($91/month), dev ($72/month).

my3enviornments.png
prod_diagram.png

Mission Complete

Our mission was to create and deploy a set of auto-scaling web servers, front ended by a load balancer for our development, staging and production environments across 3 different AWS regions.  Through the power of infrastructure as code we utilized Terraform to define, plan and automate a consistent set of deployments. Mission Complete.

Terraform Series

This is part of a Terraform series in which we cover:

Using Terraform to Up Your Automation Game - Building the Fleet

Populating our Virtual Private Cloud

In the previous post we successfully created our Virtual Private Cloud (VPC) in AWS via infrastructure as code utilizing Terraform, which provided us the ability to stand up and tear down our infrastructure landing pad on demand.  Now that our landing pad is complete and can be deployed at any time, let's build our fleet of load balanced web servers.

Building the Fleet Using Terraform Modules

Taking a similar approach to our VPC build out we will once again utilize Terraform modules, this time to create and build out our web server fleet.  In addition to the Terraform Module Registry there are a number of different sources from which to select ready built modules - including GitHub.  For our web server cluster we will utilize a short and simple webserver_cluster module that I have made available in my GitHub terraform repository.

This module creates a basic web server cluster which leverages an AWS launch configuration and auto scaling group to spin up the EC2 instances that will be perfuming as web servers.  It also places a load balancer in front of these servers which balances traffic amongst them and performs health checks to be sure the fleet is bullet proof.  The module also configures the necessary security groups to allow http traffic inbound.  All we need to do is to specify the size and number of the web servers and where to land them.

To call this module we simply need to append to the main.tf file to call the webserver_cluster module and specify how our web server fleet should be built.

In the code statement above we simply call out the source of our webserver_cluster module which resides in GitHub, specify a name for our cluster, the image and size server to use, a key name should we need to connect to an instance, the minimum and maximum number of servers to deploy, along with the VPC and subnets to place them in (referenced from our VPC build out).

In this case we are going to deploy two web servers to the public subnets we built in our VPC.

Deploying the Fleet

After updating our main.tf file with the code segment above, let's now initialize and test the deployment of our web servers.  Since we are adding a new module plan we must rerun our terraform init command to load the module.  We can then execute a terraform plan for validation and finally terraform apply to deploy our fleet of web servers to the public subnets of or VPC residing in AWS us-west-2.

webserver_cluster_module.png

Validate the Plan and Deploy using terraform plan and terraform apply.

terraform_plan_webservers.png
terraform_apply.png
terraform_plan2.png
terraform_apply2.png

Accessing the Fleet

So our deployment is complete, but how can we access it?  When building infrastructure, Terraform stores hundreds of attribute values for all of our resources.  We are often only interested in just a few of these resource, like the DNS name of our load balancer to access the website.  Outputs are used to identify and tell Terraform what data is important to show back to the user.

Outputs are stored as variables and it is considered best practice to organize them in a separate file within our repository.  We will create a new file called outputs.tf in the  same directory as our main.tf file and specify the key pieces of information about our fleet, including:  DNS name of the load balancer, private subnets, public subnets, NAT IPs, etc.

After creating and saving the outputs.tf file, we can issue a terraform refresh against our deployed environment to refresh its state and see the outputs.  We could have also issued a terraform output to see these values, and they will be displayed the next time terraform apply is executed.

outputs.png

Browsing to the value contained in our elb_dns_name output, we see our website.  Success.

web_output.png

Scaling the Fleet

So now that our fleet is deployed, let's scale it.  This is a very simple operation requiring just a small adjustment to the min and max size setting within the webserver_cluster module.  We will adjust two lines in main.tf and rerun our plan/deployment.

....  min_size            = 8 max_size            = 10  .... 
scalethefleet.png

Viola.  Our web server fleet now has been scaled up with an in place update that has no service disruption.  This showcases the power of infrastructure as code and AWS auto-scaling groups.

awsscalethefleet1.png
awsscalethefleet.png

Scaling back our fleet, as well as clean up is equally as easy.  Simply issue a terraform destroy to minimize AWS spend and wipe our slate clean.

Multi-Region/Multi-Enviornment Deployment

Now that we have an easy way to deploy and scale our fleet, the next step is to put our re-usable code to work to build out our development, staging and production environments across AWS regions.

Terraform Series

This is part of a Terraform series in which we cover:

Nutanix Community Edition & Automation VM (NTNX-AVM) on Ravello

There is nothing that can replace a good home lab for testing and staying relevant with technology, but for me Ravello comes pretty close.  For those not familiar with Ravello it is a "Cloud Application Hypervisor" that allows you to run multi-VM applications on top of any of it's supported clouds (Oracle Public Cloud, Amazon AWS, and Google Cloud Platform).  Through the use of "blueprints" you can easily publish a lab environment to any of Ravello's supported clouds without having to run you own lab at home.  That is of major benefit to me personally because it provides me a low cost & fast way to utilize a lab environment using the blueprints that Ravello makes available in its repository.  Two of my favorites are AutoLab and Nutanix Community Edition (CE).

There are some great resources for using Ravello and in this post I will be focusing on the Nutanix CE blueprint along with a cool new Automation VM (NTNX-AVM) that was recently released by Thomas Findelkind

Installing Nutanix CE on Ravello

Nutanix Community Edition is great blueprint made available by Nutanix on Ravello for use in familiarizing yourself with the Nutanix software and Prism management interface.  It is 100% software, so it is very simple to deploy following a few simple steps which Angelo Luciani captured in a short video.  Here are my abbreviated steps:

1. Add blueprint to my Ravello Account

ravellorepo.png

2. Publish & Deploy Nutanix CE from blueprint

I like to be sure to publish with an optimization for performance, choosing a cloud location that is close.  You will notice that the CE deploys as a VM with 4 vCPU and 16GB of memory.  Public IP addresses are also assigned so that we can access the application remotely, which we will do in the next step.  Ravello also allows you to see your pricing details to run this blueprint.

3. Validate that your CE application is working appropriately.

Once the Nutanix CE application is published (which can take several minutes depending on what cloud you published to), you will notice that the VM shows in a running state.  You can connect to the Prism web interface remotely by selecting the 'External Access for' sub-interface NIC1/1, and selecting 'Open'.

This will open your web browser attaching to port 9440 on the public address as shown in the image above.  It does take a little bit of time once the CE VM is up and running for Prism to be responsive.  Stay patient. My average wait time is about 15-20 minutes, but I have had take as long as 40 minutes. If you open the browser and see the following message, it is normal - you just need wait for the cluster to be fully available.

You can also ssh into the Nutanix controller VM using ssh nutanix@PublicIPAddress tied to NIC1/1 interface.  The default password is nutanix/4u  If you run a cluster status command it will show you the status of the cluster.

4. Login into Prism and explore what Nutanix can offer.  

The default user name and password for Prism is admin / admin and you will be prompted to change the password and update to the latest release if you would like. Now that we have a running Nutanix CE cluster let's put something useful on it like the NTNX-AVM automation VM.

Adding NTNX-AVM Automation VM to Ravello Blueprint

The Nutanix automation VM (NTNX-AVM) was recently released by Thomas Findelkind and was designed for easy deployment of automation 'recipes' within the context of a VM that can be deployed on and run against a Nutanix cluster.  Once deployed the NTNX-AVM provides golang, git, govc, java, ncli (CE edition), vsphere CLI and some automation scripts the community has developed all preinstalled within a VM running on a Nutanix cluster.  I think would work great within Ravello for testing some automated scripts so let's step through the process for adding it to our application & blueprint.

The full details as well as the code for installing the NTNX-AVM are available on GitHub at https://github.com/Tfindelkind/DCI, but here are my abbreviate steps for getting this up and moving on Ravello:

1. Adding a CentOS VM to my Nutanix CE Application

The NTNX-AVM is deployed using a simple bash script which will do all the heavy lifting.  This script can be run really from anywhere that can communicate with your Nutanix cluster.  I would like to eventually build a docker container for this part of the in but in the meantime an out of band CentOS VM in Ravello will do the trick.  Just so happens Ravello has a vanilla CentOS ready for me to add so that makes it easy.

In order to create and attach to this CentOS VM, a key pair needs to be created and assigned in your Ravello library.  This is easily done and downloaded for future SSH connectivity.  The VM also needs to be published as the Ravello application has been updated.  Once again, something easily done.

Assign the newly create Key Pair RavelloSSH to the CentOS VM

Once the key pair is assigned, the application can be updated to include the CentOS VM.

And we can connect to it by opening an SSH session to it's public IP address

ssh ravello@31.220.71.33 -i RavelloSSH.pem

2. Download and unzip the NTNX-AVM install files and scripts

One of the requirements for running the NTNX-AVM install is that it makes use of genisoiamge/mkisofs which my vanilla install doesn't have so, I need to pull that down after updating my CA certificates to connect to the EPEL package repository.

sudo su
yum --disablerepo=epel -y update ca-certificates
yum install git
git clone https://github.com/Tfindelkind/DCI

You can verify that all of the files have been dowloaded

3. Update the config for the CentOS recipe to deploy NTNX-AVM

Since we are using CentOS to deploy our NTNX-AVM, we need to modify the  -> "/recipes/NTNX-AVM/v1/CentOS7/config" to specify the parameters of our environment.  Things like the VM name, IP for VM, Nameserver, etc.  A quick look at the network canvas within Ravello shows us how things are connected.

In our case the Ravello application is working on the 10.1.1.x / 24 network so I will modify the configuration file accordingly.

vi ./DCI/recipes/NTNX-AVM/v1/CentOS7/config

My completed configuration file looks like this, were the new NTNX-AVM will have a 10.1.1.200 IP address assigned to it.


[root@CentOS63vanilla DCI]# cat recipes/NTNX-AVM/v1/CentOS7/config

name="NTNX-AVM"
desc="+Golang1.7+git+govc+java8u60+ncliCE+vSphere-CLI-6.0.0+dshearer/jobber1.1+Tfindelkind/automation"
cloud_image="CentOS-7-x86_64-GenericCloud-1606.qcow2"
cloud_image_download="http://cloud.centos.org/centos/7/images/CentOS-7-x86_64-GenericCloud-1606.qcow2"
VM-NAME="NTNX-AVM"
VM-IP="10.1.1.200"
VM-NET="10.1.1.0"
VM-MASK="255.255.255.0"
VM-BC="10.1.1.255"
VM-GW="10.1.1.1"
VM-NS="10.1.1.1"
VM-USER="nutanix"
VM-PASSWORD="nutanix\/4u"
VCENTER_IP="10.1.1.80"
VCENTER_USER="root"
VCENTER_PASSWORD="nutanix\/4u"

4. Deploy the NTNX-AVM

Now that the prep work is wrapped up, it is time to run create a place to put our NTNX-AVM on the Nutanix CE cluster and run the dci.sh script from our CentOS VM to deploy it.  First we will create a new storage container called 'prod' within Prism, as well as configure a network it can use.

Then we will run the dci.sh script.  The full syntax of the script can be found in Thomas' writeup.  The syntax and settings I used are as follows, with the 10.1.1.11 being the IP address of the Nutanix CVM and prod being the container we are saving the VM to.

./dci.sh --recipe=NTNX-AVM --rv=v1 --ros=CentOS7 --host=10.1.1.11 --username=admin --password=nutanix/4u --container=prod --vlan=VLAN0 --vm-name=NTNX-AVM

The dci.sh script will do the following:

  • First it will download the cloud image from a CentOS. Then it will download the deploy_cloud_vm binary.
  • It will read the recipe config file and generate a cloud seed CD/DVD image. Means all configuration like IP,DNS,.. will be saved into this CD/DVD image called “seed.iso”.
  • DCI will upload the CentOS image and seed.iso to the AHV image service.
  • The NTNX-AVM VM will be created based on the CentOS image and the seed.iso will be connected to the CD-ROM. At the first boot all settings will be applied. This is called the NoCloud deployment based on cloud-init. This will only work with cloud-init ready images.
  • The NTNX-AVM will be powered on and all configs will be applied.
  • In the background all tools/scripts will be installed
RunBuild.png

After the script is complete we can see that our NTNX-AVM is deployed on our Nutanix CE cluster but it is powered off.  This is because we are working with limited memory in our Ravello environment, so the memory on our VM needs to be adjusted from 2GB down to 1GB. 

AdjustMemory.png

Once that adjustment is made, the VM powers on nicely for it to complete it's configuration and tools/scripts installation.  We can check the status of this final process by simply connecting via ssh to the NTNX-AVM IP, which is 10.1.1.200 in my case.  We can check the /var/log/cloud-init-output.log to see our progress and make sure that all tools are fully installed because this is done in the background after the first boot.

So let’s check if /var/log/cloud-init-output.log will show something like:

We know everything is complete when we see the 'The NTNX-AVM is finally up after NNN seconds." message.

5. Using the Nutanix Automation VM: NTNX-AVM

Now that we have a working NTNX-AVM, we have access to a number of great automation tools with more coming thanks to Thomas' automation scripts.  To be sure all is good, let's utilize an ncli command on the NTNX-AVM to check our cluster status.

ssh nutanix@10.1.1.200
cli -s 10.1.1.11 -u admin
cluster status

I look forward to using this new addition to my Ravello Nutanix CE blueprint for future automation.