There is nothing that can replace a good home lab for testing and staying relevant with technology, but for me Ravello comes pretty close. For those not familiar with Ravello it is a "Cloud Application Hypervisor" that allows you to run multi-VM applications on top of any of it's supported clouds (Oracle Public Cloud, Amazon AWS, and Google Cloud Platform). Through the use of "blueprints" you can easily publish a lab environment to any of Ravello's supported clouds without having to run you own lab at home. That is of major benefit to me personally because it provides me a low cost & fast way to utilize a lab environment using the blueprints that Ravello makes available in its repository. Two of my favorites are AutoLab and Nutanix Community Edition (CE).
There are some great resources for using Ravello and in this post I will be focusing on the Nutanix CE blueprint along with a cool new Automation VM (NTNX-AVM) that was recently released by Thomas Findelkind.
Installing Nutanix CE on Ravello
Nutanix Community Edition is great blueprint made available by Nutanix on Ravello for use in familiarizing yourself with the Nutanix software and Prism management interface. It is 100% software, so it is very simple to deploy following a few simple steps which Angelo Luciani captured in a short video. Here are my abbreviated steps:
1. Add blueprint to my Ravello Account


2. Publish & Deploy Nutanix CE from blueprint


I like to be sure to publish with an optimization for performance, choosing a cloud location that is close. You will notice that the CE deploys as a VM with 4 vCPU and 16GB of memory. Public IP addresses are also assigned so that we can access the application remotely, which we will do in the next step. Ravello also allows you to see your pricing details to run this blueprint.

3. Validate that your CE application is working appropriately.
Once the Nutanix CE application is published (which can take several minutes depending on what cloud you published to), you will notice that the VM shows in a running state. You can connect to the Prism web interface remotely by selecting the 'External Access for' sub-interface NIC1/1, and selecting 'Open'.


This will open your web browser attaching to port 9440 on the public address as shown in the image above. It does take a little bit of time once the CE VM is up and running for Prism to be responsive. Stay patient. My average wait time is about 15-20 minutes, but I have had take as long as 40 minutes. If you open the browser and see the following message, it is normal - you just need wait for the cluster to be fully available.

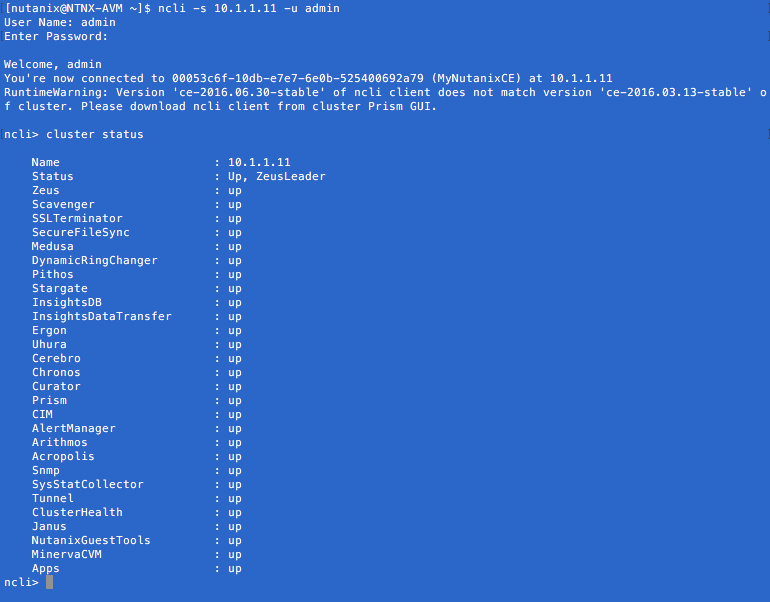
You can also ssh into the Nutanix controller VM using ssh nutanix@PublicIPAddress tied to NIC1/1 interface. The default password is nutanix/4u If you run a cluster status command it will show you the status of the cluster.

4. Login into Prism and explore what Nutanix can offer.
The default user name and password for Prism is admin / admin and you will be prompted to change the password and update to the latest release if you would like. Now that we have a running Nutanix CE cluster let's put something useful on it like the NTNX-AVM automation VM.


Adding NTNX-AVM Automation VM to Ravello Blueprint
The Nutanix automation VM (NTNX-AVM) was recently released by Thomas Findelkind and was designed for easy deployment of automation 'recipes' within the context of a VM that can be deployed on and run against a Nutanix cluster. Once deployed the NTNX-AVM provides golang, git, govc, java, ncli (CE edition), vsphere CLI and some automation scripts the community has developed all preinstalled within a VM running on a Nutanix cluster. I think would work great within Ravello for testing some automated scripts so let's step through the process for adding it to our application & blueprint.
The full details as well as the code for installing the NTNX-AVM are available on GitHub at https://github.com/Tfindelkind/DCI, but here are my abbreviate steps for getting this up and moving on Ravello:
1. Adding a CentOS VM to my Nutanix CE Application
The NTNX-AVM is deployed using a simple bash script which will do all the heavy lifting. This script can be run really from anywhere that can communicate with your Nutanix cluster. I would like to eventually build a docker container for this part of the in but in the meantime an out of band CentOS VM in Ravello will do the trick. Just so happens Ravello has a vanilla CentOS ready for me to add so that makes it easy.

In order to create and attach to this CentOS VM, a key pair needs to be created and assigned in your Ravello library. This is easily done and downloaded for future SSH connectivity. The VM also needs to be published as the Ravello application has been updated. Once again, something easily done.


Assign the newly create Key Pair RavelloSSH to the CentOS VM

Once the key pair is assigned, the application can be updated to include the CentOS VM.

And we can connect to it by opening an SSH session to it's public IP address

ssh ravello@31.220.71.33 -i RavelloSSH.pem

2. Download and unzip the NTNX-AVM install files and scripts
One of the requirements for running the NTNX-AVM install is that it makes use of genisoiamge/mkisofs which my vanilla install doesn't have so, I need to pull that down after updating my CA certificates to connect to the EPEL package repository.
sudo su
yum --disablerepo=epel -y update ca-certificates
yum install git
git clone https://github.com/Tfindelkind/DCI
You can verify that all of the files have been dowloaded

3. Update the config for the CentOS recipe to deploy NTNX-AVM
Since we are using CentOS to deploy our NTNX-AVM, we need to modify the -> "/recipes/NTNX-AVM/v1/CentOS7/config" to specify the parameters of our environment. Things like the VM name, IP for VM, Nameserver, etc. A quick look at the network canvas within Ravello shows us how things are connected.

In our case the Ravello application is working on the 10.1.1.x / 24 network so I will modify the configuration file accordingly.
vi ./DCI/recipes/NTNX-AVM/v1/CentOS7/config
My completed configuration file looks like this, were the new NTNX-AVM will have a 10.1.1.200 IP address assigned to it.
[root@CentOS63vanilla DCI]# cat recipes/NTNX-AVM/v1/CentOS7/config

name="NTNX-AVM"
desc="+Golang1.7+git+govc+java8u60+ncliCE+vSphere-CLI-6.0.0+dshearer/jobber1.1+Tfindelkind/automation"
cloud_image="CentOS-7-x86_64-GenericCloud-1606.qcow2"
cloud_image_download="http://cloud.centos.org/centos/7/images/CentOS-7-x86_64-GenericCloud-1606.qcow2"
VM-NAME="NTNX-AVM"
VM-IP="10.1.1.200"
VM-NET="10.1.1.0"
VM-MASK="255.255.255.0"
VM-BC="10.1.1.255"
VM-GW="10.1.1.1"
VM-NS="10.1.1.1"
VM-USER="nutanix"
VM-PASSWORD="nutanix\/4u"
VCENTER_IP="10.1.1.80"
VCENTER_USER="root"
VCENTER_PASSWORD="nutanix\/4u"
4. Deploy the NTNX-AVM
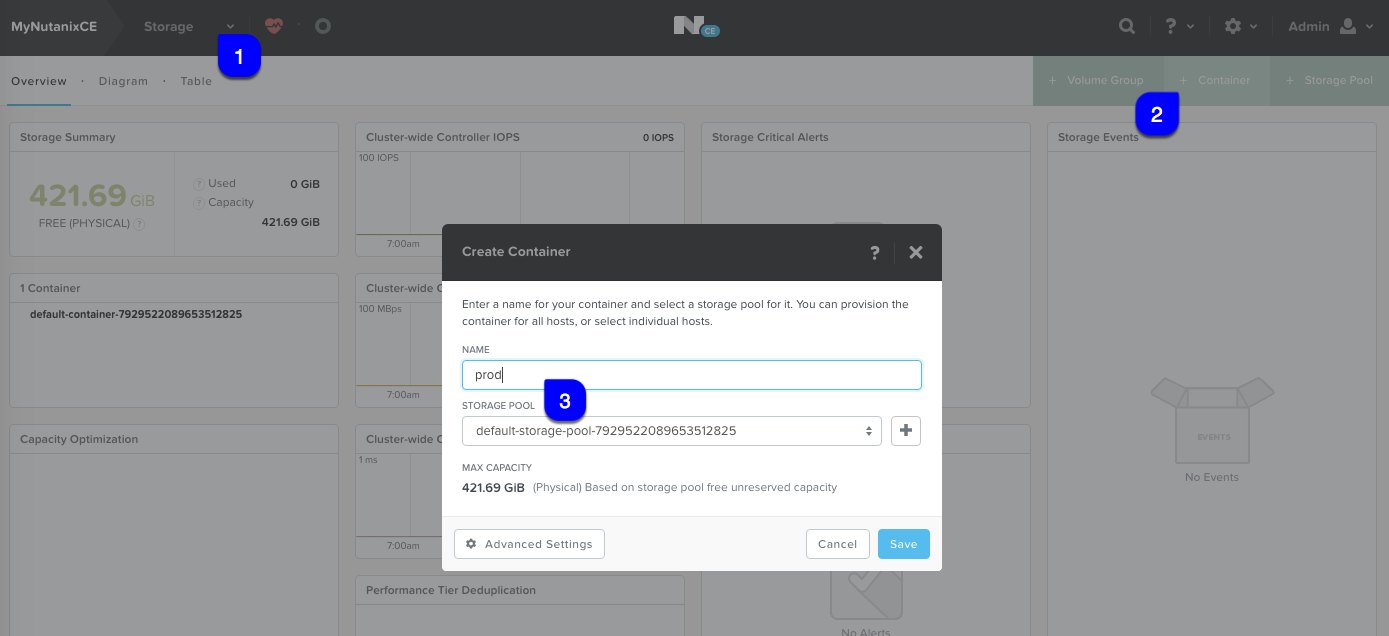
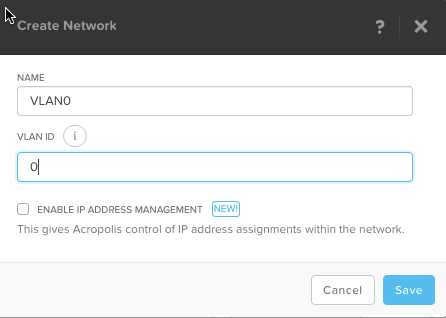
Now that the prep work is wrapped up, it is time to run create a place to put our NTNX-AVM on the Nutanix CE cluster and run the dci.sh script from our CentOS VM to deploy it. First we will create a new storage container called 'prod' within Prism, as well as configure a network it can use.
Then we will run the dci.sh script. The full syntax of the script can be found in Thomas' writeup. The syntax and settings I used are as follows, with the 10.1.1.11 being the IP address of the Nutanix CVM and prod being the container we are saving the VM to.
./dci.sh --recipe=NTNX-AVM --rv=v1 --ros=CentOS7 --host=10.1.1.11 --username=admin --password=nutanix/4u --container=prod --vlan=VLAN0 --vm-name=NTNX-AVM
The dci.sh script will do the following:
- First it will download the cloud image from a CentOS. Then it will download the deploy_cloud_vm binary.
- It will read the recipe config file and generate a cloud seed CD/DVD image. Means all configuration like IP,DNS,.. will be saved into this CD/DVD image called “seed.iso”.
- DCI will upload the CentOS image and seed.iso to the AHV image service.
- The NTNX-AVM VM will be created based on the CentOS image and the seed.iso will be connected to the CD-ROM. At the first boot all settings will be applied. This is called the NoCloud deployment based on cloud-init. This will only work with cloud-init ready images.
- The NTNX-AVM will be powered on and all configs will be applied.
- In the background all tools/scripts will be installed

After the script is complete we can see that our NTNX-AVM is deployed on our Nutanix CE cluster but it is powered off. This is because we are working with limited memory in our Ravello environment, so the memory on our VM needs to be adjusted from 2GB down to 1GB.

Once that adjustment is made, the VM powers on nicely for it to complete it's configuration and tools/scripts installation. We can check the status of this final process by simply connecting via ssh to the NTNX-AVM IP, which is 10.1.1.200 in my case. We can check the /var/log/cloud-init-output.log to see our progress and make sure that all tools are fully installed because this is done in the background after the first boot.
So let’s check if /var/log/cloud-init-output.log will show something like:

We know everything is complete when we see the 'The NTNX-AVM is finally up after NNN seconds." message.

5. Using the Nutanix Automation VM: NTNX-AVM
Now that we have a working NTNX-AVM, we have access to a number of great automation tools with more coming thanks to Thomas' automation scripts. To be sure all is good, let's utilize an ncli command on the NTNX-AVM to check our cluster status.
ssh nutanix@10.1.1.200
cli -s 10.1.1.11 -u admin
cluster status
I look forward to using this new addition to my Ravello Nutanix CE blueprint for future automation.