Defining, Detecting and Alerting On Sensitive Data

In my last post, I provided a simple HOW TO for finding music and video content within file shares, VMs, and datasets.  Let's now look at how to define, detect and alert when sensitive data is stored.

detecting Sensitive information (Credit Card, SSN, PII/PHI)

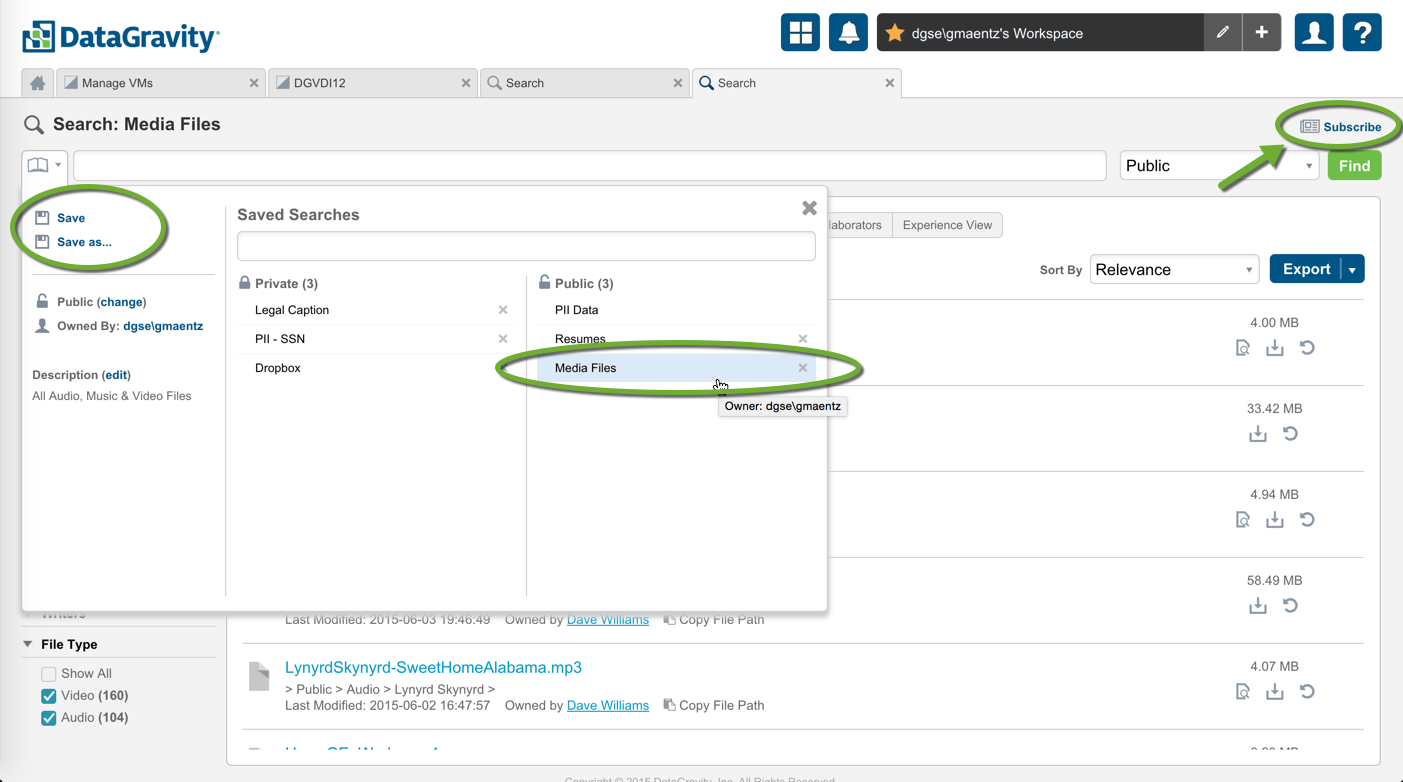
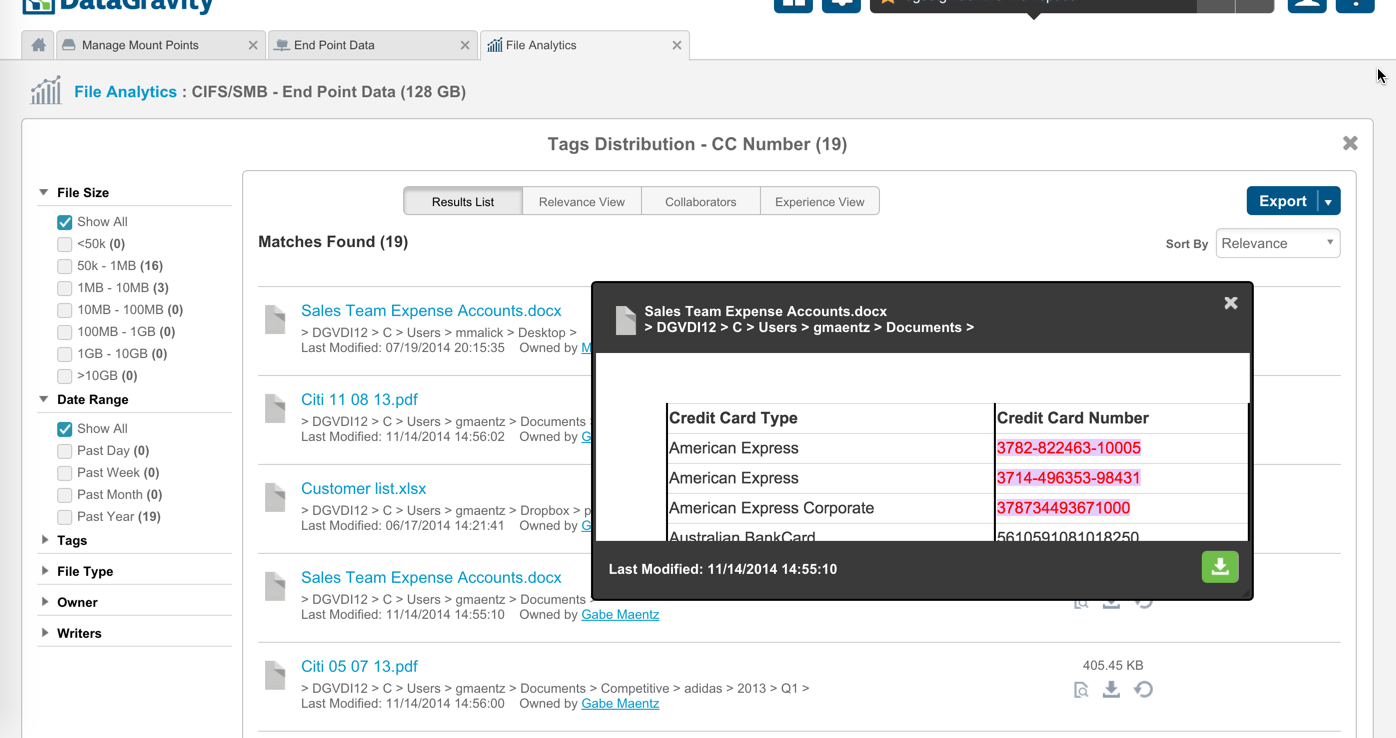
DataGravity extends the ability to detect and search by keyword and/or metadata tags for information that is sensitive.  There are and number of pre-defined tags that the system can easily find within all files on shares or within VMs, but also supports the ability to define and create your own custom tags.  Examples of these sensitive tags are Social Security Numbers and Credit Card Numbers.  These can be applied directly to any search as shown below where we are looking for Social Security Numbers on the Public share. 

It looks like we found 7 matches where files contain Social Security numbers, which is validated by performing a preview of the file (directly from the search results).

I could of course could modify my search to include other sensitive tags as well as shown below.

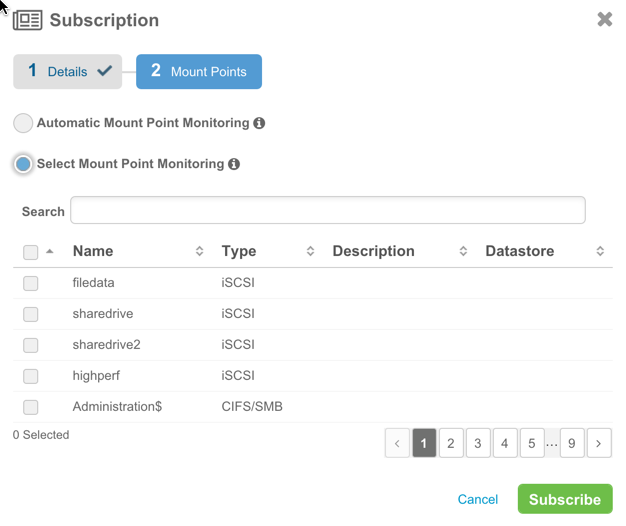
Subscription and Email notification

Now having a search defined for detecting sensitive data, we want to be notified when this type of information is found within the environment.  Subscriptions and Content Alerts are both new features of DataGravity V2 and facilitate proactive notification for when sensitive content is found.  Subscriptions allow us to specify a frequency with which to run the sensitive data search and be alerted via email.  We can search for sensitive data across the entire system, or monitor specific shares or VMs.

The email provides us with a link to view the search results and details specific to each share of VM.

Logging & alerting

If we wish to log and forward any details surrounding sensitive data which has been identified, we can create a Content Alert.  

Content Alerts allow us to specify and forward system level events to be notified when sensitive data is found. These alerts can be given a specific syslog event level which then are forwarded to the centralized log aggregation, security information and event management (SIEM) infrastructure.

Similar to the email notifications provided using subscriptions, content alerts will contain a link to view the search results and details specific to each share or VM.


iTunes on the SAN

This is a relatively straight forward HOW TO with the DataGravity Discovery Series that solves a real problem for a number of customers I meet - detecting personal media and music on the company department and home shares.  When you think about the amount of space an iTunes library of music can take up, and then the cost of backing that up and replicating, it makes a lot of sense why customers would want to know where this stuff exists.  The challenge is, unfortunately no one has a lot of time to find who is storing the latest Taylor Swift album, where it lives, and continuously check if there is any other media also being stored - so let's simplify things.

Searching for Media

Let's build a simple search which simply filters out all video and audio content on any given share or virtual machine.  Opening the DataGravity Search Tile presents us with a full search for all content, but that can be narrowed down using the File Type facet on the left hand side of the screen and selecting Video and Audio.

Filter for all Video and Audio content, to only show Media files

This results in 264 items of Media content which lists the location, owner, size - all of which can be exported. 

We can also take a look at who the top users are that are contributing to the problem, and also what music that have saved over time using the Experience and Relevance views of the search.  Dave Williams really likes to save and listen to his music, and has been doing for several years.

Very simple way to get a real time look at how much media consuming our storage, but it may also be helpful to be notified when new music content is added, so let's build a subscription to this search.

Save and subscribe to the Search 

Subscriptions to searches are a new feature of DataGravity V2, but extremely convenient for being proactively notified.  We first will save the Search for Music & Media, which allows us to share it with others who may wish to run the search for their data and then we will subscribe to be notified.

Using the Subscribe link on the top right corner of the screen we can specify how frequently we want to be notified when Media content is identified, and to whom an email should be sent.

We can also specify if there is a specific set of VMs or Shares we want to look for this data on, or chose the Automatic Monitoring for all share types.

Email Notification of Media Files with link to search

Now we will get a nice email with a synopsis of all those Media Files being saved within the environment and where they live.  Clicking on the link in the Results Found portion of the email for a specific share or virtual machine will automatically pull you into the full search view for more detail on what was found.

RE-IMAGINE REPLICATED VMS with VEEAM AND DATAGRAVITY

My last blog article received some great attention, and highlights the growing demand for understanding and determining where sensitive data lives on corporate endpoints.  That post walked through the steps taken with a great free product by Veeam Software called Veeam Endpoint Protection, and coupled it with the power of DataGravity's File Analytics on a simple SMB share.

In fact the popularity of the article spurred a question at a local VMUG in which it was asked if DataGravity might be able to provide the same level of insights to to replicated VMs sitting at a DR location.  It just so happens that this customer is already using Veeam Backup and Replication to backup and replicate VMs to a DR environment every night - ready to failover, should the need arise.  The customer asked 'if rather then simply replicating these VMs to an otherwise unintelligent data repository, could I replicate to a DataGravity datastore at my DR location to make use of the VM File Analytics?'  This is a great use case and the answer is YES.

You may be asking - Replicated VMs - doesn't DataGravity have to act as your primary storage?  Well in fact DataGravity is enterprise primary storage but there is nothing that prohibits it from also serving as a great Backup/Replication target.  In fact DataGravity by design, natively performs it's analytics on VMDK files residing on NFS datastores regardless if those datastores are serving in a primary storage capacity or as a replication target; regardless of the VM's power state. This means VMs can be replicated, remain powered off at the DR location and non-intrusively be analyzed for sensitive information. Very powerful.  Let's see how to do it:

Create Target VM Datastore for Replica VMs

The first step would be to create a VM datastore which will be used as a replication target.  We will call it 'DataMRI' - because we plan on taking a deeper look into the health of our replicated VMs, so the name fits.

CreateDataStore.png

This is a simple four step process, which the DataGravity 'Create Datastore' setup will walk you through.

  1. Specify a name and and  size for the datastore
  2. Specify which ESXi hosts the datastore should be attached to
  3. Specify the Discovery Point Policy - this is the frequency in which the Data Analytics will be run on the replicated VMs.
  4. Validate the datastore is attached to your ESXi hosts at the DR location.  You can see that the datastore is online and ready to receive VMs.

Configure Veeam replication Job

Since this customer is already using Veeam Replication it is very simple to modify or create a new replication job that specifies the newly created datastore (DataMRI) at the DR location as the replication target.  As I have indicated in previous articles, I like the simplicity and flexibility that Veeam provides for my backups, and their replication engine serves very well in a modern data protection architecture.  It offers image-based VM replicas, built in WAN Acceleration, and the ability to failover and failback to/from those replicas.

To create a Replication Job, log into Veeam and step through the New Replication Job setup.

  1. Create a New VMware Replication Job
  2. Specify a name for the Replication Job
  3. Specify the VMs to include for replication.


4. Specify the Destination to replicate to: Host, Resource Pool, Folder, and Datastore (DataMRI) that was created in 'Create Target DataStore' above.

5. I like to append a suffix to my replicated VMs so I know that these are replicated, so I appreciate this option in Veeam.  I used the suffix _DataMRI, and I choose to only keep 1 restore point.

6. Schedule the time for the replication to occur - I choose every night at 2:00 AM.

7. Review the summary details and save the job.

Veeam Replication Job - Part 2.png

Replicate VMs

Now that we have the target datastore defined for our VM replicas, and the replication job in place.....let's replicate. The timing of the replication will of course follow the schedule you specified above in the Veeam Replication job and below you can see that we are able to highlight the status of the job on a per-VM basis.

We can also see the real time performance on the target DataGravity datastore, as well as the status of the VM replicas which are starting to populate the target.

Now that we have VMs starting to come over to the target DataGravity datastore, let's take a look at the Analytics and information that these VMs are holding.

VM Analytics

To begin, let's take a look at the File Analytics view from within DataGravity.  This view allows us to search and uncover all the details for our replicated VMs and the data which they contain.

Looking at one of the replicated VMs - DGVDI01_DataMRI, we can start to see some critical information.  We can see the Top Users of the VM, the Most Active Users on that VM, Dormant Data and File Growth over time. Additionally we can see that the VM contains a number of files with Social Security and Credit Card numbers.  15 files with Social Security Numbers on this VM.....let's dig into that.

The impressive thing is that the replicated VM doesn't need to be powered on at all to see this level of detail, so it doesn't disrupt the data protection architecture or DR procedure.

Further detail on the makeup of these files, as well as a full listing is only a click away.  Here is a list of the 15 files stored on this VM that contain Social Security numbers.  This is making tremendous use of our VM Replicas.


Analyze VMS and find Sensitive Data with Zero Impact

Replication can now serve more then just as a safety net.  Why not include the power of Veeam Replication with DataGravity Analytics inside you backup and DR strategy - and not only be ready to failover in the event of service disruption, but also be informed of how that data is growing, as well as what sensitive information is being saved within the infrastructure.

Much thanks to my customer base for presenting such a great use case, and allowing me to share.

Finding Sensitive Data on Endpoints with Veeam Endpoint Backup FREE and DataGravity

I have for a long time been a huge fan of Veeam - both as a customer and as a virtualization community member.  I cut my teeth with their FastSCP product (remember that?) to efficiently move files between ESX/ESXi hosts and datastores.  It was awesome, and the best part about it was that Veeam offered it completely for free. In fact, they still do as part of Veeam Backup Free edition.  Fast forward a number of years, and Veeam has done it again.  This time they have released Veeam Endpoint Backup - a completely free standalone solution to help protect Windows endpoints.

Knowing their reputation for developing products that simply 'just work', I was eager to try out this new Endpoint product.  In fact I recently had a customer who asked if they might be able to use the product to save data from some of their Windows clients up to a DataGravity SMB share.  Now that caught my attention, and sure enough 'it just works'.  Let's check out how.

Install Veeam Endpoint Backup Free & Configure Backup

There are several tutorials on the internet to show you how to install Veeam Endpoint Backup, so I will spare you all of the 'Next, Next, Next, Finish' details.  It really is that simple.  I tested this with Windows 7, but can be run on Windows 8, 2008R2 & 2012.  

Once installed, you simply need to configure the backup of the endpoint.  I chose to backup the entire computer to a shared folder on my DataGravity array which also serves as a backup repository for the Veeam backups of my VMs.  I scheduled this backup to run every night at a specific time, but one cool option is to schedule it run whenever the backup target is available.  Veeam Endpoint Backup actually throttles the frequency/activity of the backup so it doesn't compete with other applications running on your endpoint, and it doesn't mess around backing up stuff that doesn't matter like temporary and page files.  Very nice.

Backup Mode.png

Run a Backup of your Windows Endpoint

Now that we have configured and and started to protect our Windows endpoints, we can check the status of these Veeam restore points very quickly from the Control Panel.  You can open this up from endpoint itself by selecting the Veeam icon in the system tray.

This will allow you to see the status of all of your restore points, and drive into any of them to initiate a recovery.

RESTORING FILES TO A DATA-AWARE DATAGRAVITY SMB SHARE

To begin a restore, simply select the 'Restore Files' option under any restore point.  This launches the Backup Browser which allows us to specify the file level items to restore.  This is actually opening up the appropriate Veeam VBK and VIB files in the backup repository and presenting them in a directory tree (mounted to the the VeeamFLR directory).  In our case we won't actually be restoring the files to the original endpoint, but rather making use of the Copy function to extract all of these files up to a data-aware SMB share on the DataGravity array named End Point Data.

Checking for Sensitive INformation in Endpoint Data

We can now look at the data demographics of this endpoint within DataGravity to identify dormant data, file category growth, top consumers of space, as well as any sensitive items.  Looking at the File Analytics of this endpoint data we can see that there are several files with Credit Card numbers being saved.

Looking at the details of these files containing credit cards, we can see that this endpoint has Excel spreadsheets and Word documents with the Sales Team expense account information.  These include the credit card numbers of the team being stored in clear text.

We can also see from the search below, that there is content being saved out to DropBox and Google Drive from this endpoint.


Summary

For my customer, this series of steps was exactly what they were looking for - 1.) Getting a backup of their most important PCs & 2.) Understanding if there is sensitive data being saved, carried around (laptops), or being synced from these PCs.  The economics of the solution certainly couldn't be beat.  This highlights just one use case for the Veeam Endpoint product paired with DataGravity, but it certainly can offer much more: Volume level restores, Bare Metal Restores with Recovery Media, integration with Veeam Backup & Replication - the list goes on and on, which is a topic for a separate post.  Nice work Veeam.